The Map column headers operation takes source files with differing header schemas and maps them to a unified header schema. This allows the datasets to be unioned.
For example, you may have three source files, each with a column of policy numbers, but named differently in each dataset: Policy Number, Pol. #, Policy Num. These column names can be mapped to a common ‘Policy Number’ field.
A typical workflow incorporating column mapping would be:
Additionally, columns in the output dataset can be added, removed or re-ordered, and empty or missing columns in the source data populated with text or numbers.
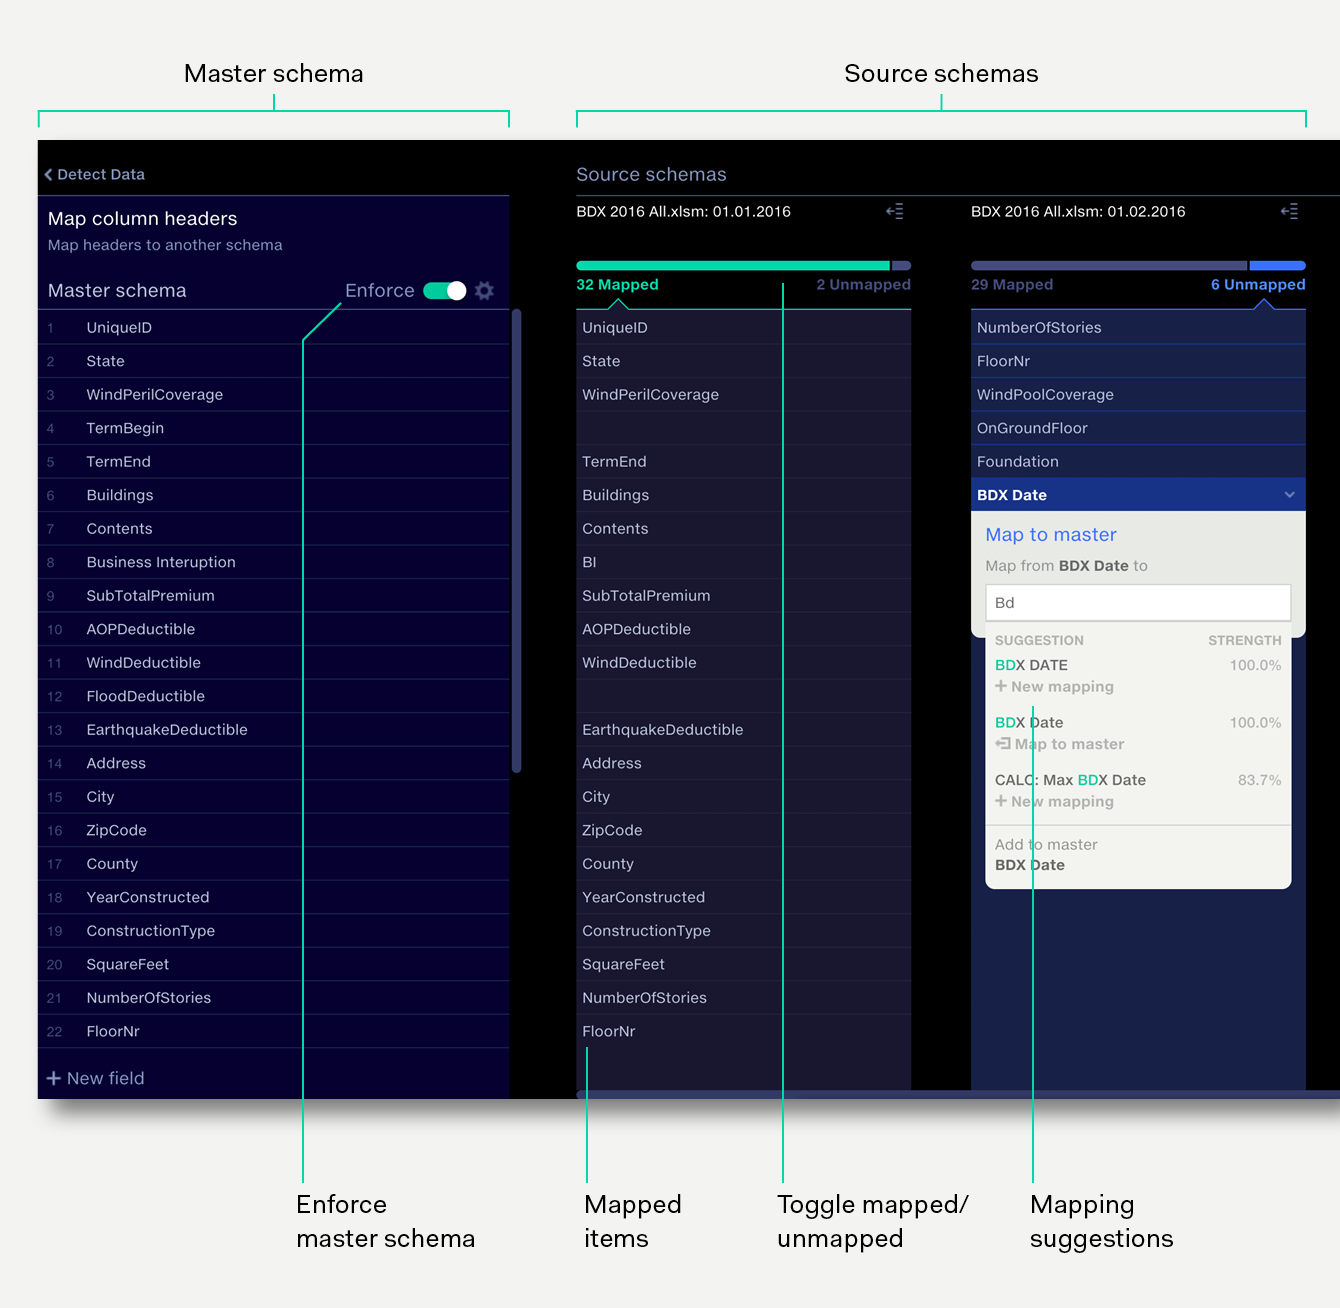
List of columns in master schema.
Lists of columns in source schemas. Horizontal position of mapped items indicates their mapping to the master.
The layout shows each column mapping across the source schemas and the master schema horizontally, making it very quick to visually deduce the mapping structure across all your sources.
Toggle between mapped and unmapped items.
Switch between a mode which enforces the exact master schema, or a mode which only maps column header names. See Enforcing the master schema.
Clicking on an unmapped item suggests mappings in the master schema, alongside suggestions for new mappings.
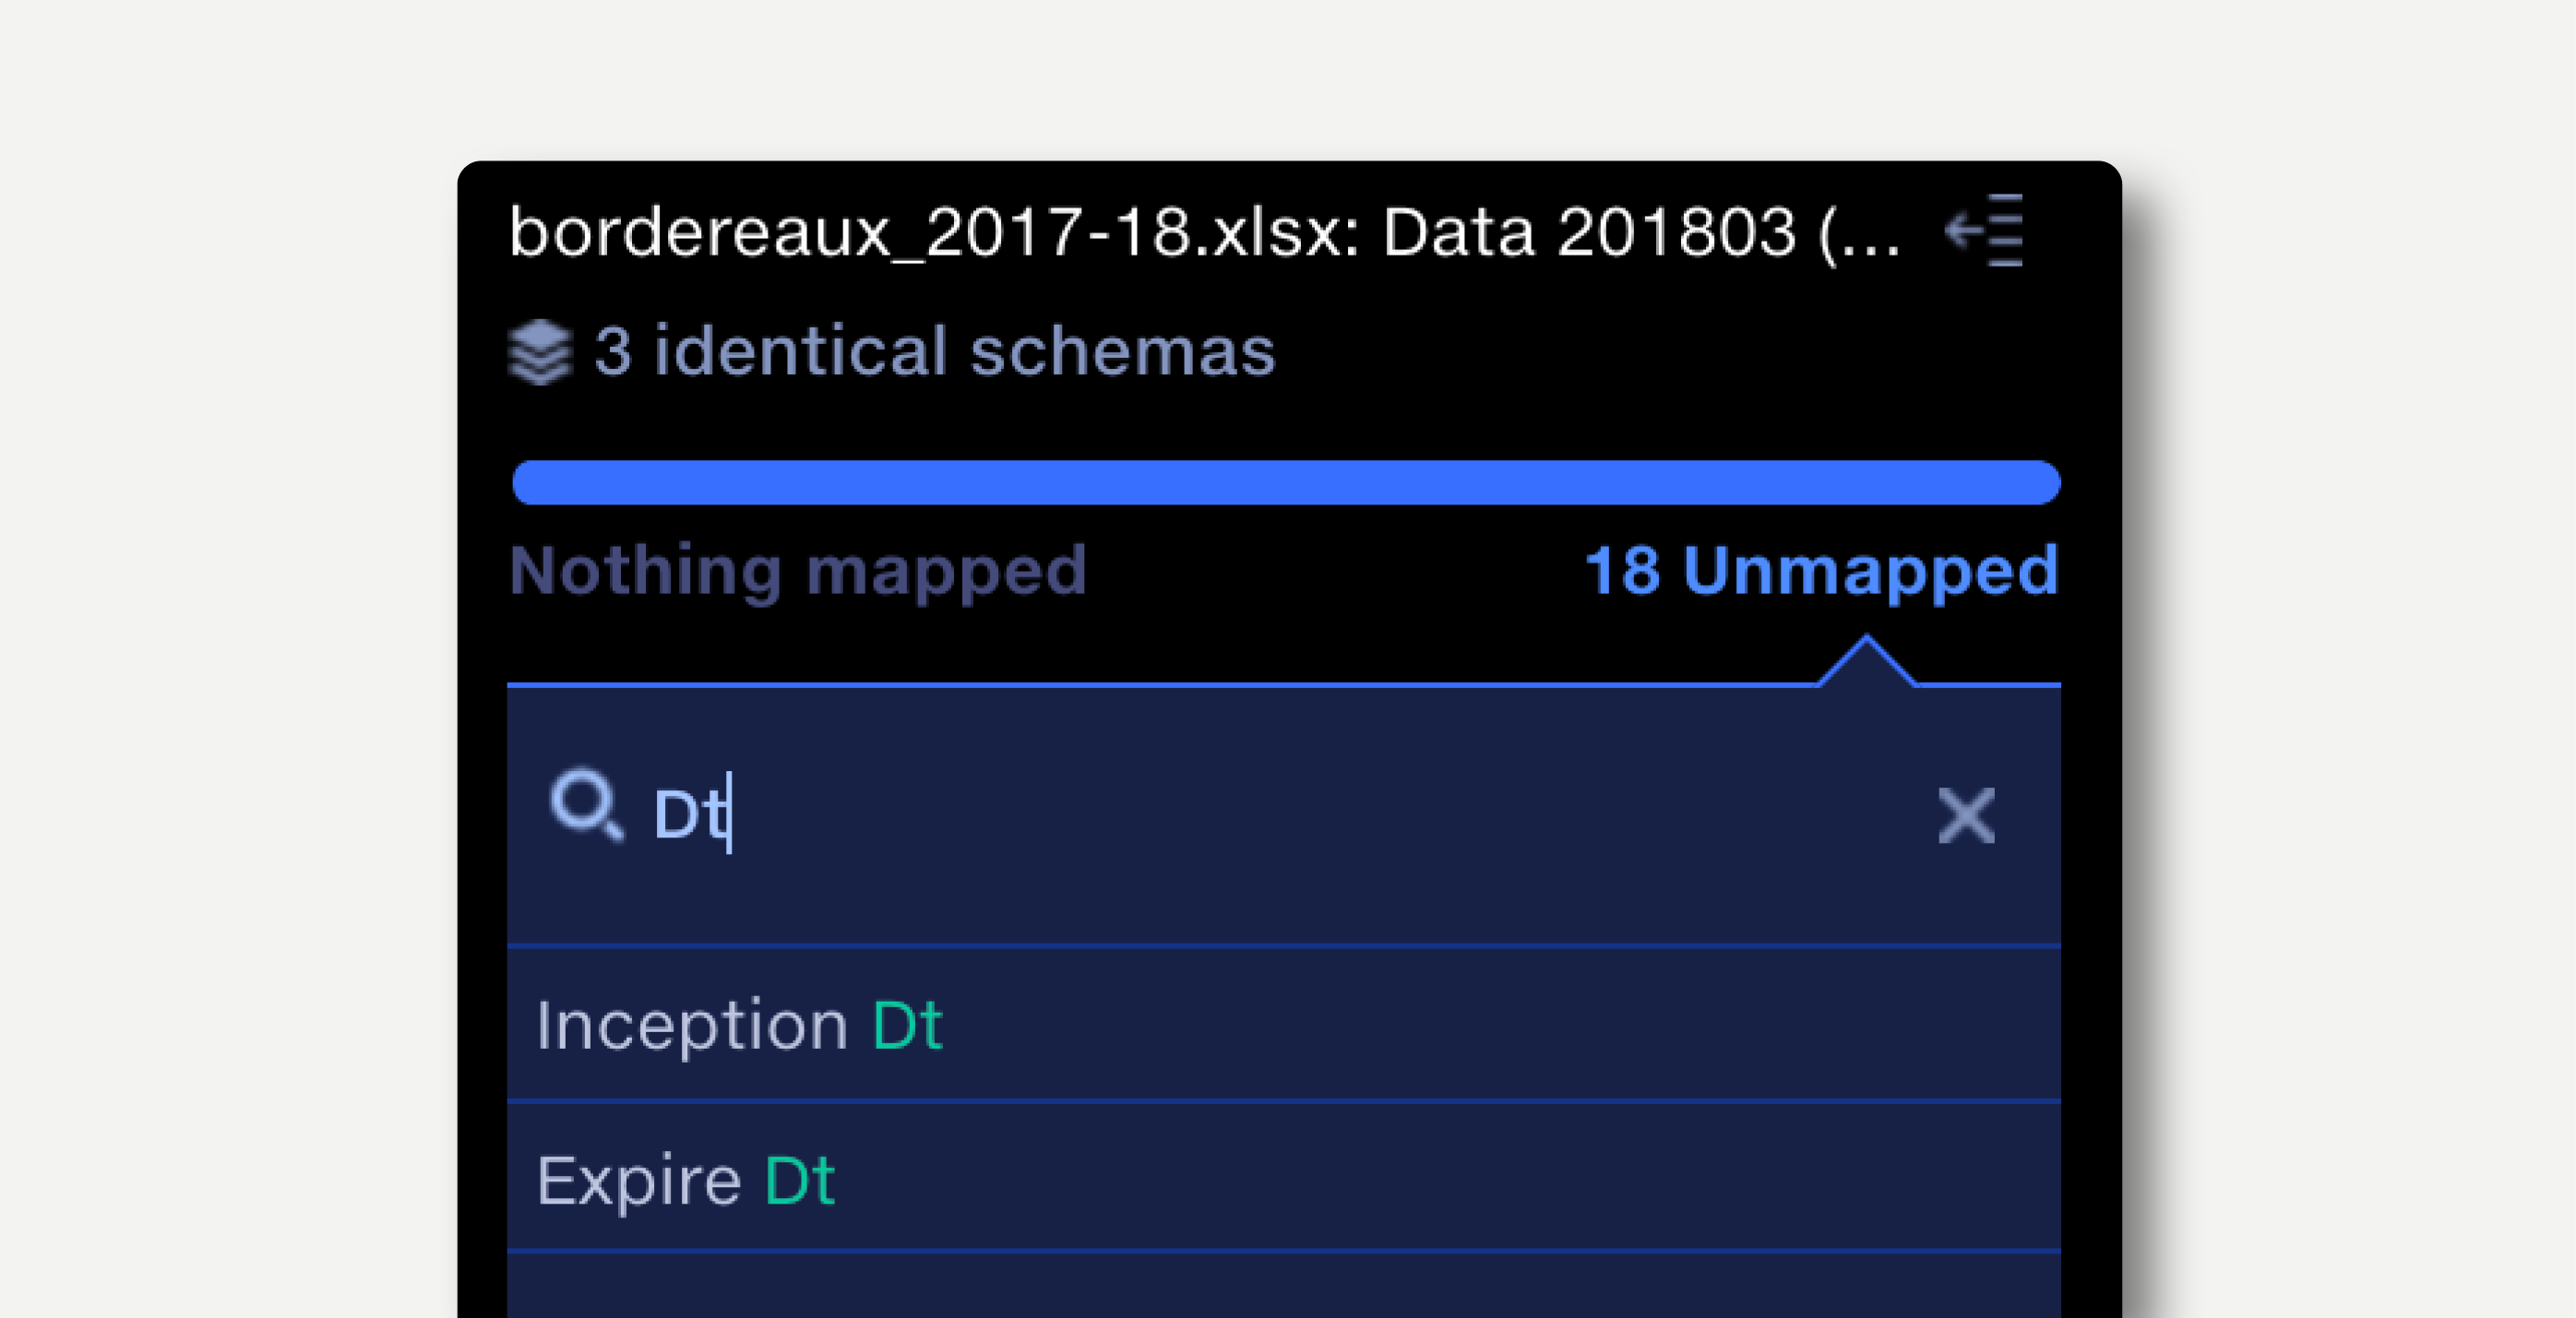
Click the search bar at the top of an unmapped schema to search unmapped items within an input.
On opening the operation, the initial view shows the distinct column structures across the input files to the operation, with no master schema or mapping defined.
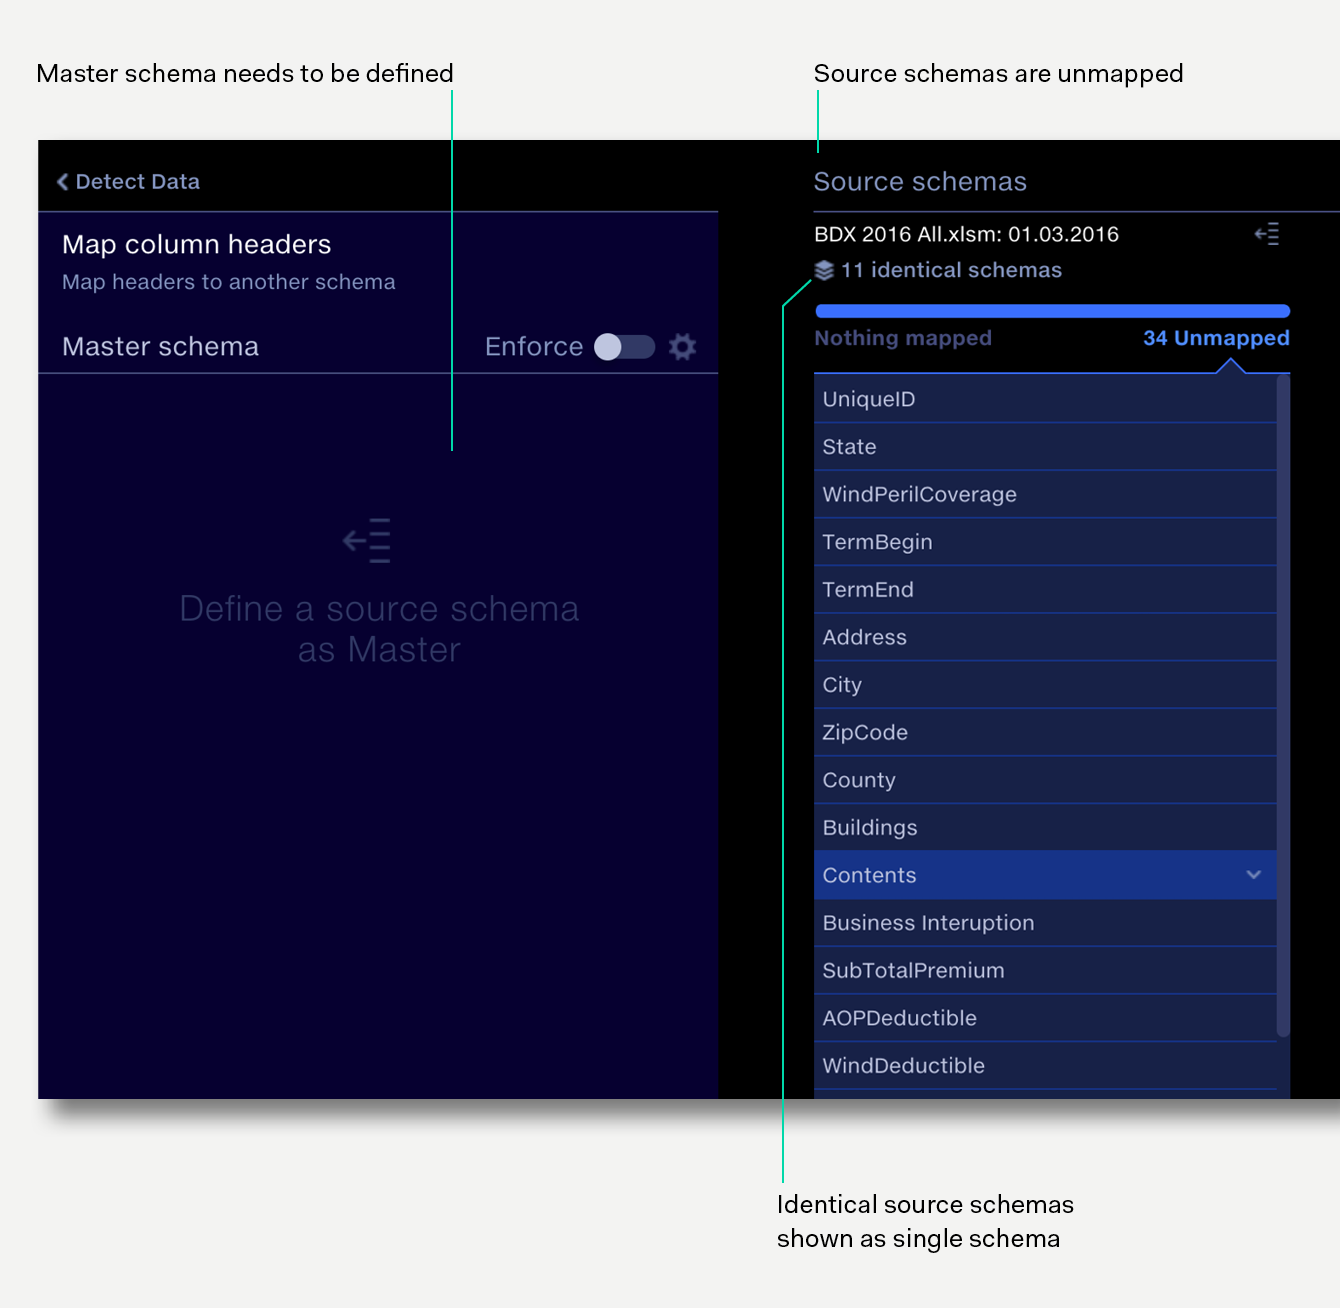
If there are multiple input files that have identical column structures, then Quantemplate will stack these together, so that only distinct columns structures are displayed. To see which input files to the operation are stacked in each distinct column structure, hover over the file name at the top of the column.
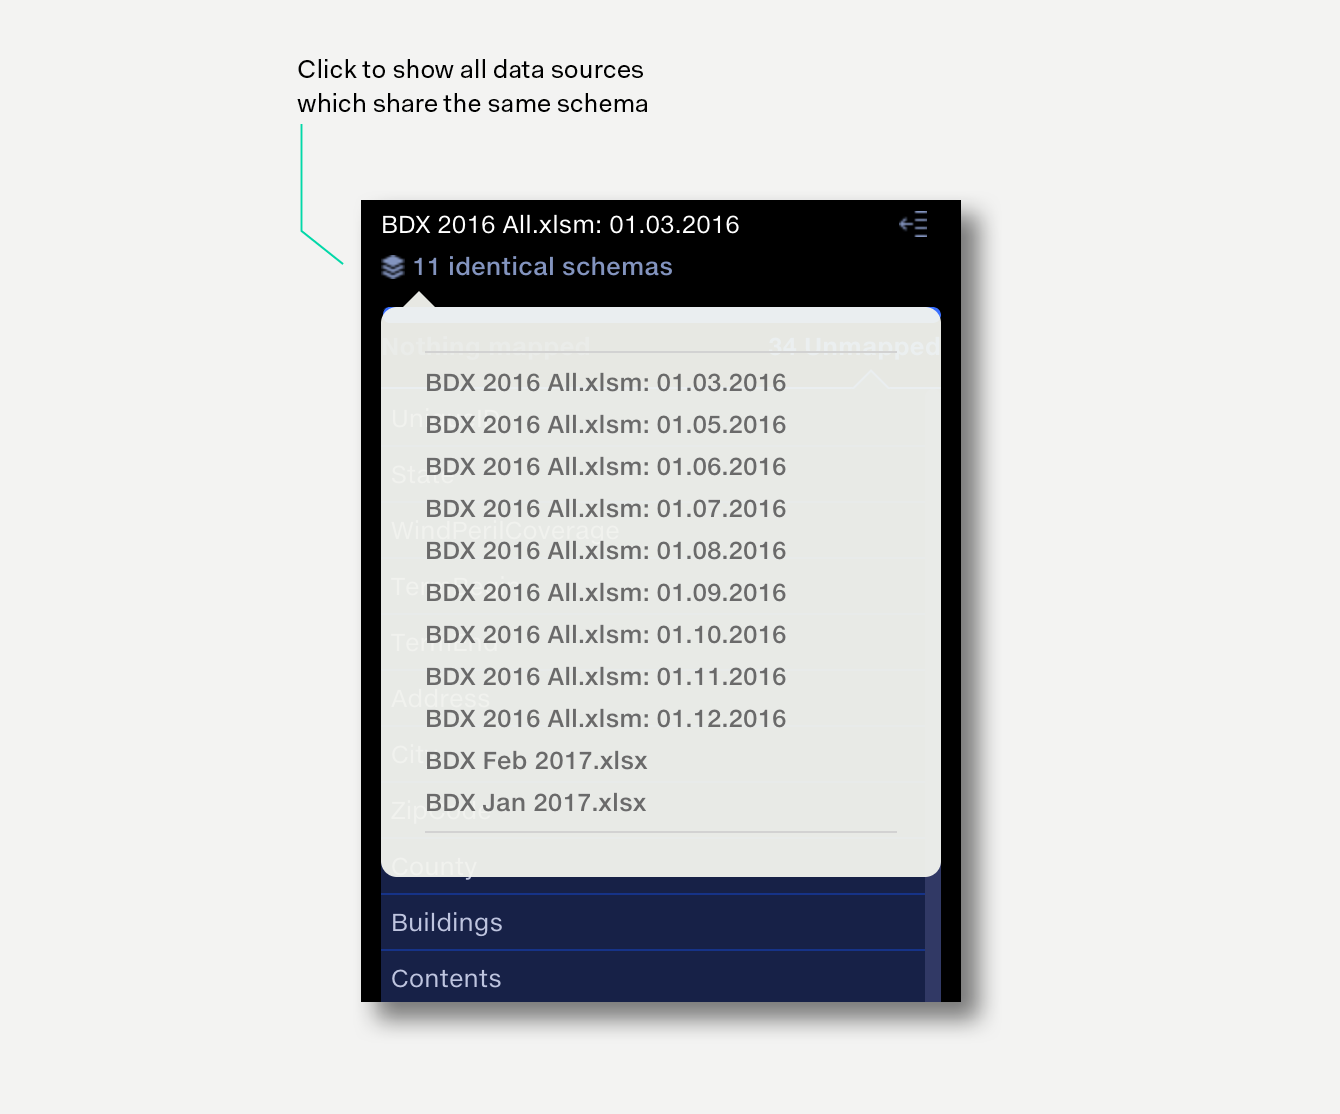
The most common scenario is to use one of the displayed file schemas as the baseline for the master schema and then to map any remaining column headers from the other source schemas to the master.
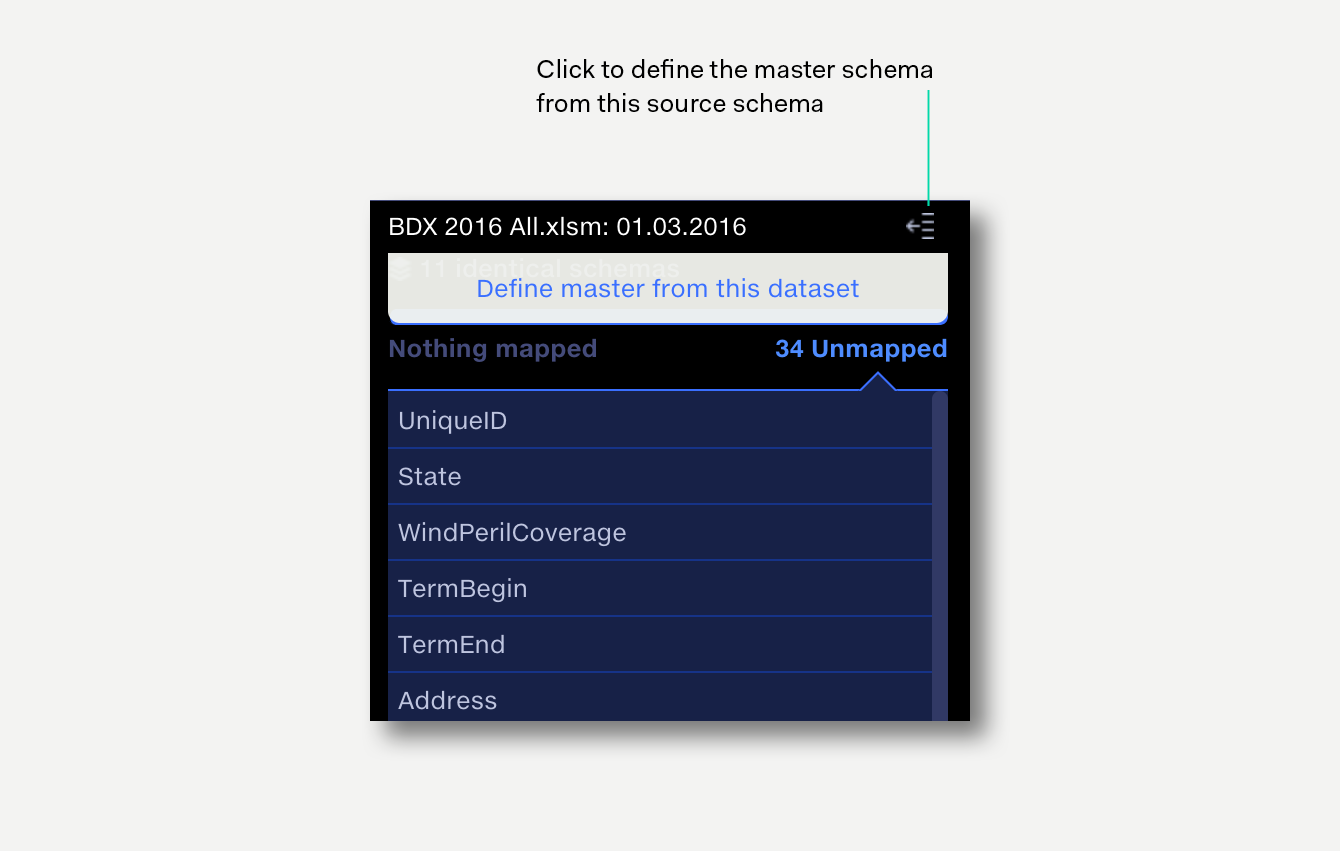
Click on Define master from this dataset for the file schema that you wish to use as a starting point for the master schema template. This will instantly:
Rather than taking a whole source schema as a starting point, individual fields can be mapped in from one or more source schemas. See Mapping in source files below.
Alternatively a master schema can be created from scratch by manually entering fields. To add a new field, click the New field button at the bottom of the master schema, enter the field name and hit return (↵).

To view unmapped fields in a source schema click on the Unmapped toggle. Clicking on an unmapped item reveals mapping suggestions.

Map to master will map the source field to an existing column header in the master schema.
New mapping appears under suggestions that are not in the master schema, and will create a field in the master schema and map the source item to it.
Add to master will take the exact name of the source column and add it to the master schema as a new field.
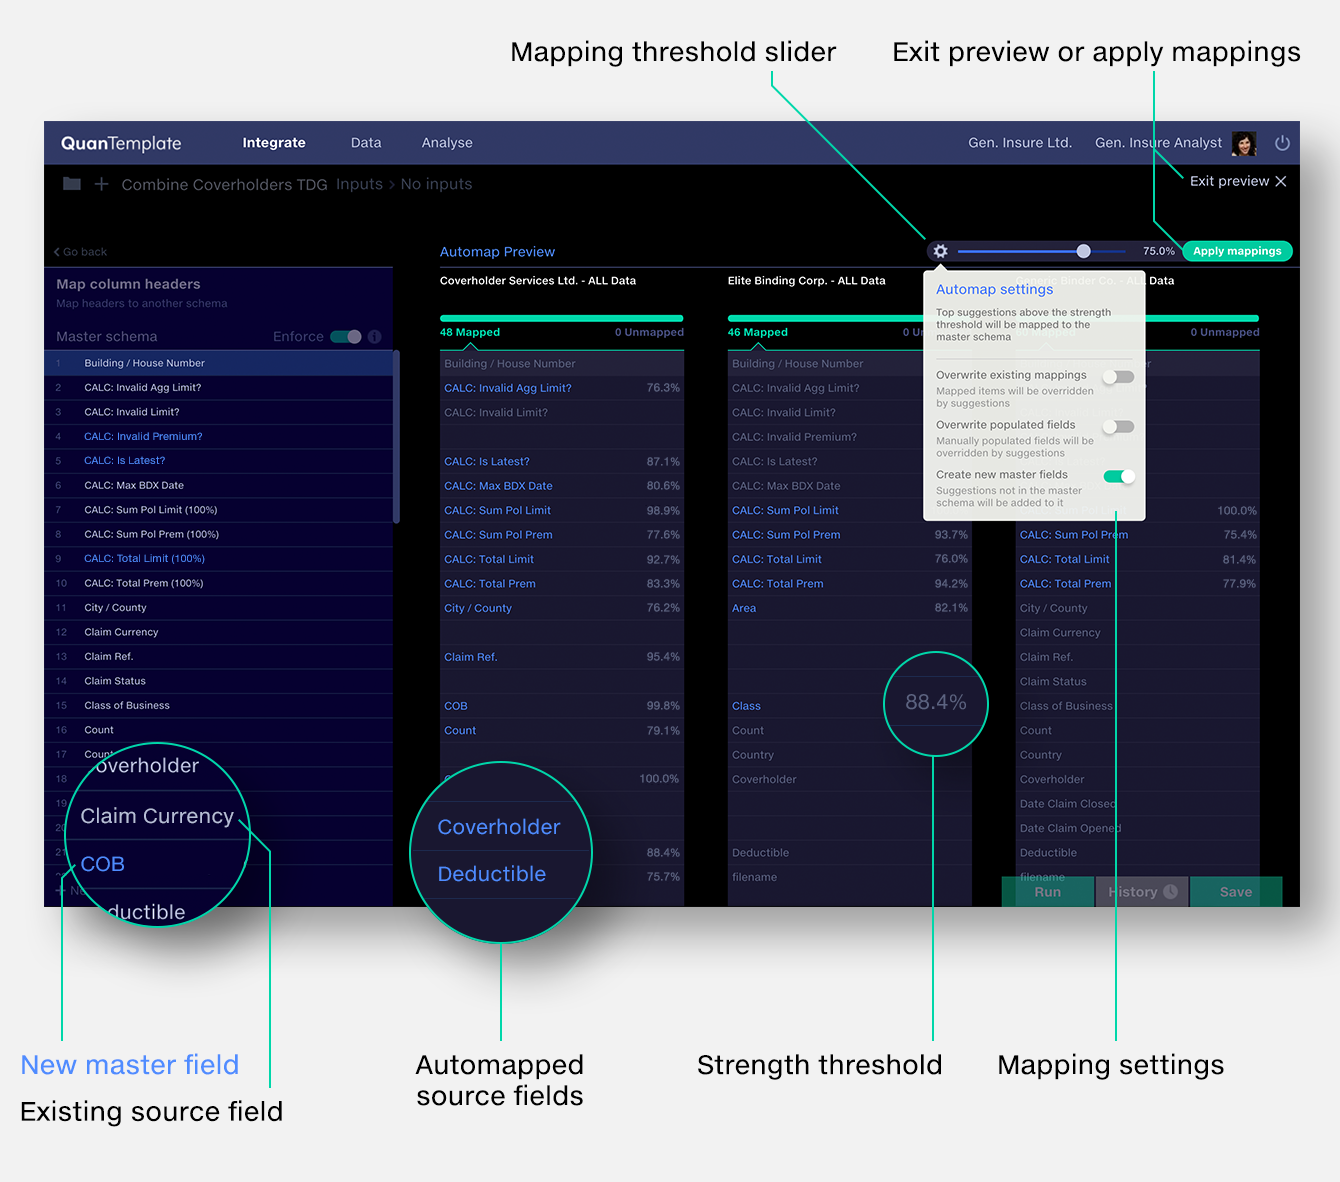
The strength rating indicates Quantemplate’s statistical confidence level in the suggested mapping.
You can unmap, remap or replace currently mapped column headers.
To see the column headers that are currently mapped for a given schema, click on the Mapped toggle. Clicking on a Mapped toggle. Clicking on a mapped item reveals mapping suggestions.

Unmap the item from the master schema. Item returns to the unmapped column.
Remap the item to a different available item in the master schema. Master items that have items from this source schema already mapped to them are not available.
Replace the item with one of the unmapped items in the source.
If Enforce schema is enabled, fields in the source can be populated with a data value or text. See Populating source fields below.
Column mapping has two modes,enforcing the master schema and column name mapping only. When the Enforce toggle is on, enforcing the master schema is enabled. This is the default setting.
Schemas of output datasets will match the master schema exactly.
Output dataset headers are renamed, schema structure remains the same.
Enforcing the master is automatically enabled when defining a master schema from a source dataset.
For a given source:
|
Source schema
|
|
Client name
|
|
Ref. no.
|
|
City
|
|
State
|
|
Country
|
Apply the following mappings:
|
Mappings
|
||
|
Client name
|
maps to
|
Client
|
|
Country
|
maps to
|
Territory
|
|
Ref. no.
|
maps to
|
Ref. no.
|
Outputs when enforce option is enabled / disabled:
|
Output options
|
|
|
Enforce on
|
Enforce off
|
|
Client
|
Client
|
|
Territory
|
Ref. no.
|
|
Ref. no.
|
City
|
|
State
|
|
|
Territory
|
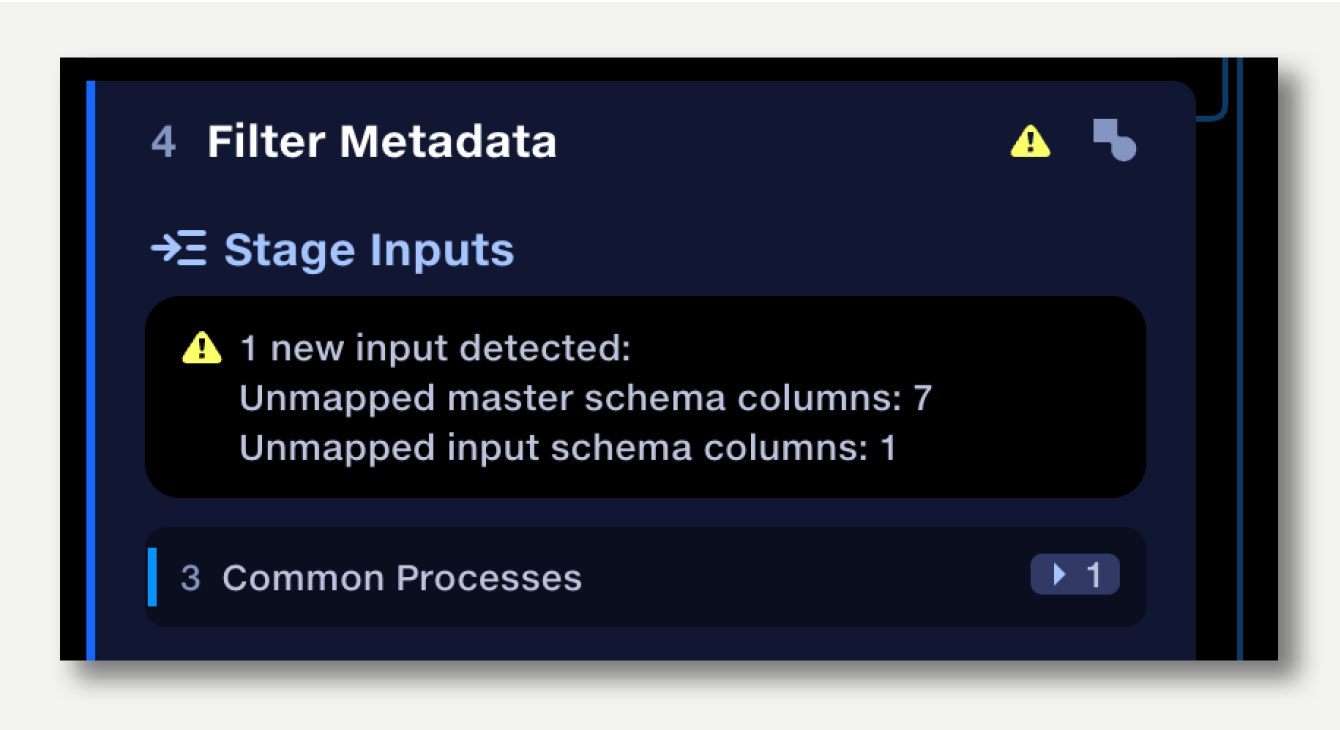
Where a master schema has been defined and a new input is added to the stage, the operation will apply the following default mapping rules:
A yellow warning will be shown in the stage panel if, after applying the above rules:
Once the mappings have been reviewed in the column header mapping operation the warning will be removed.
For a given source:
|
Source schema
|
|
Client name
|
|
Ref. no.
|
|
City
|
|
State
|
|
Country
|
and the following mappings:
|
Mappings
|
||
|
Client name
|
maps to
|
Client
|
|
Country
|
maps to
|
Territory
|
|
Ref. no.
|
maps to
|
Ref. no.
|
Adding another input with the same schema as the initial source will apply the same set of mappings to that new input.
Adding another input with a different set of column names will apply the default mapping rules, matching column names ignoring capitalisation
For a new source schema:
|
New schema
|
|
client
|
|
ref
|
|
territory
|
will result in the mappings:
|
Mappings
|
||
|
client
|
maps to
|
Client
|
|
territory
|
maps to
|
Territory
|
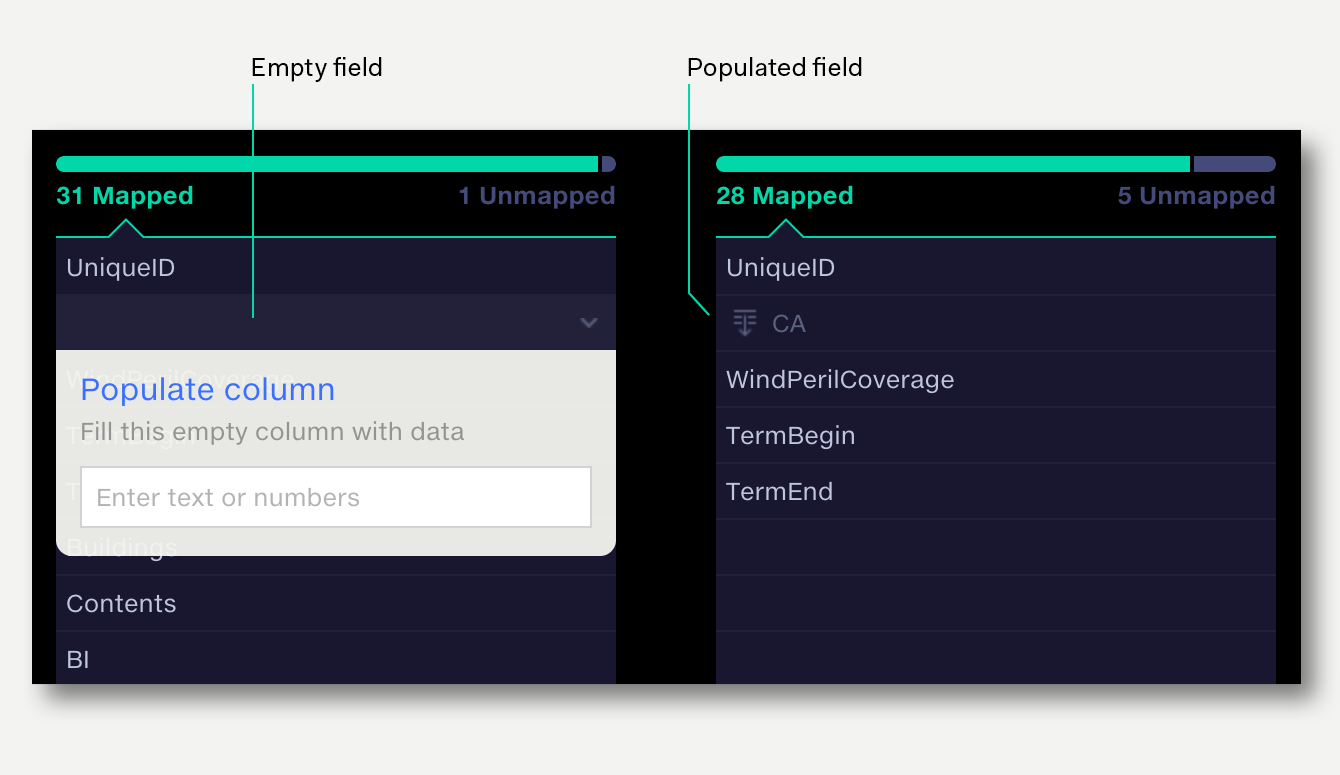
When Enforce schema is enabled and a source file has no data for a master field, that field will be output as an empty column by default. This column can be populated with homogenous data if required. For example, if your master schema contains the field currency, yet your source data has no currency column, then the empty fields can be populated with a currency value.
To populate a source column:
To remove populated data
Sometimes source datasets may not contain all the columns in your master schema. It’s often useful to populate these blank columns with a single value, such as ‘Unmapped’, so when the data is used in Analyse, these datapoints can be identified and filtered out.
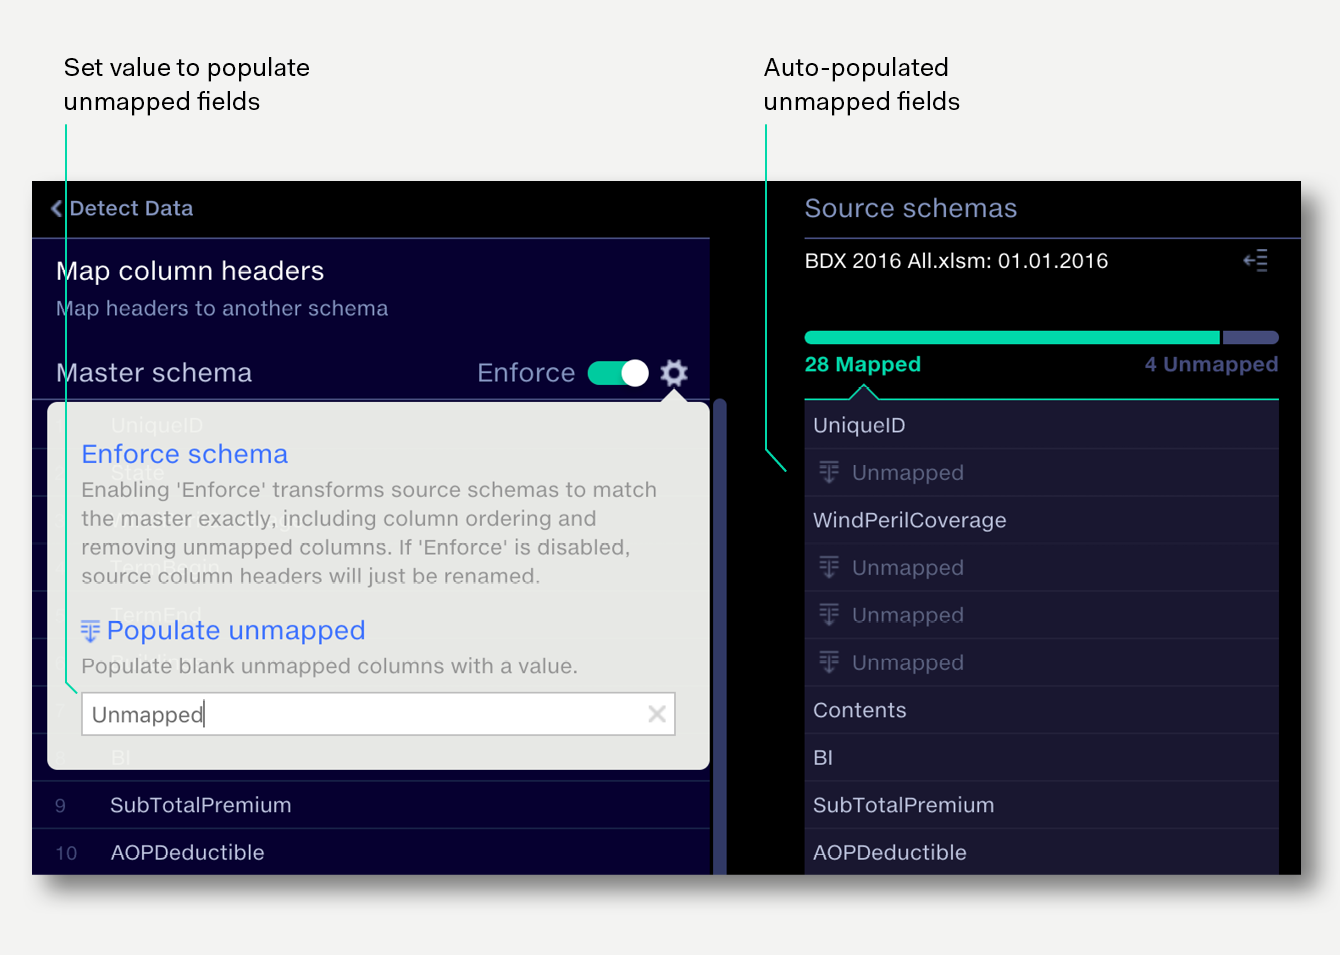
To populate all unmapped fields
Auto-populated unmapped fields can be overridden with an individual populated value. If the value for the auto-populated field changes, the overridden value is retained.
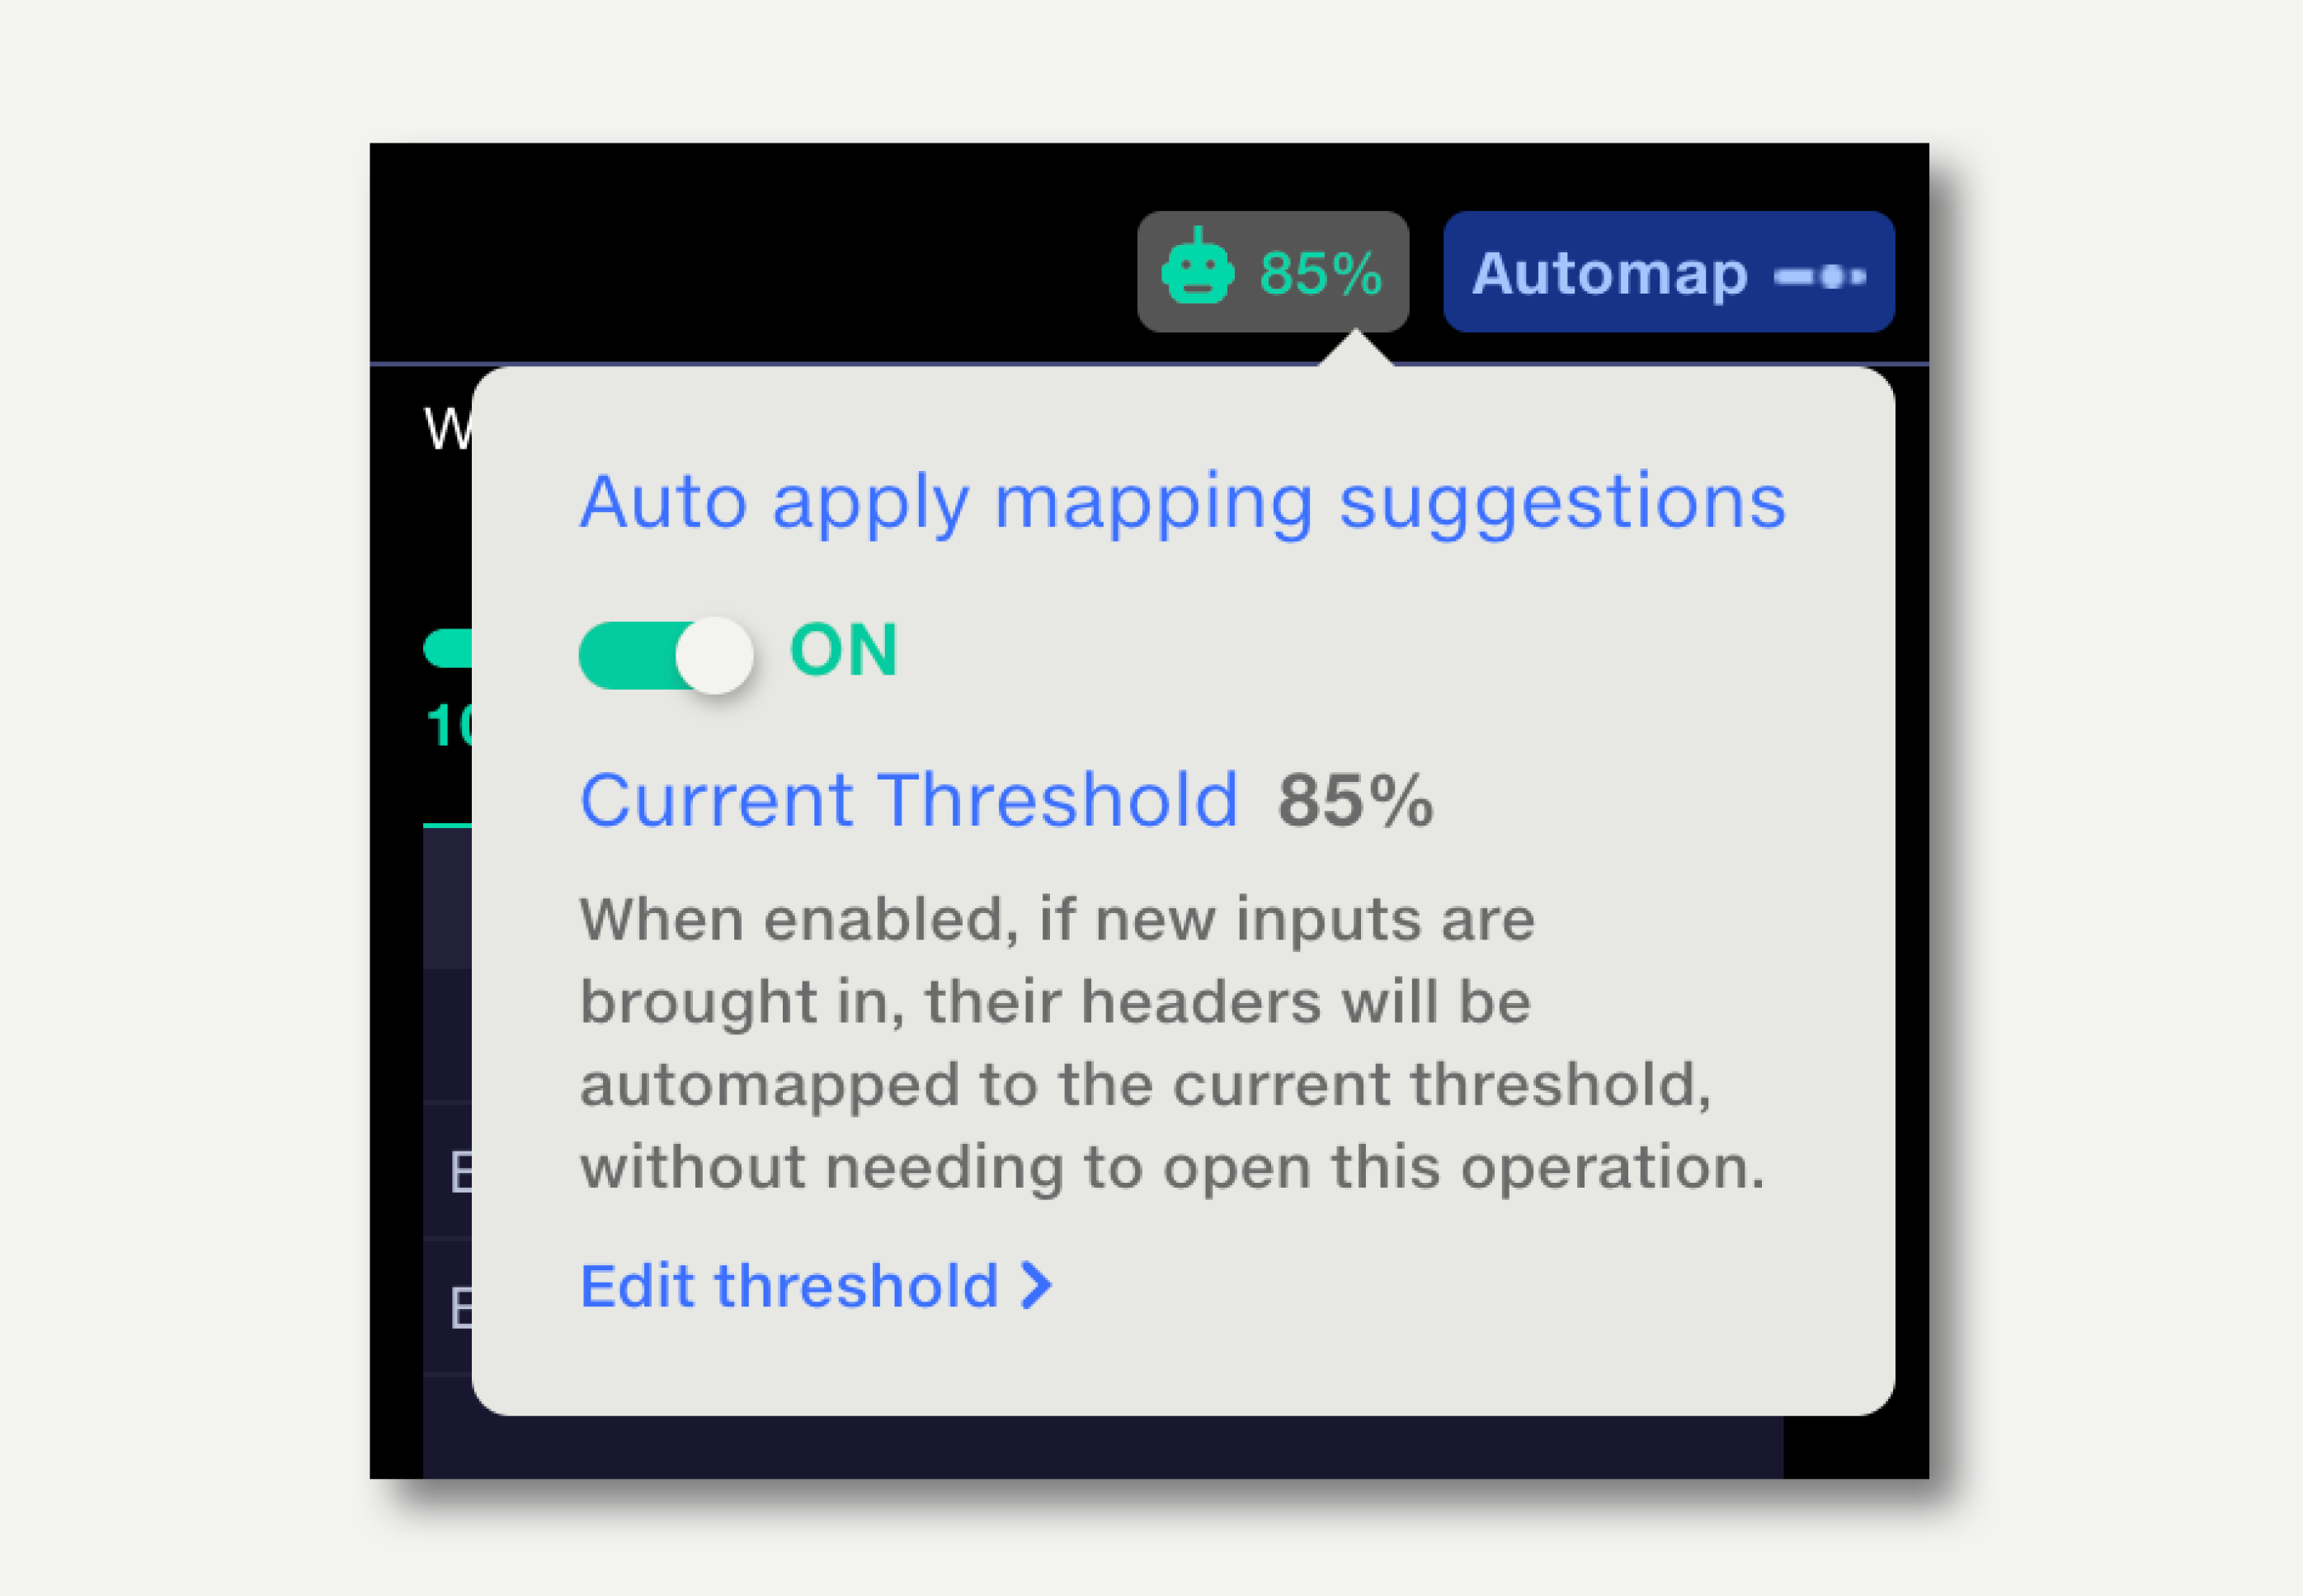
The Automap function automates the column header mapping process by applying all suggested mappings above a user-specified strength threshold.
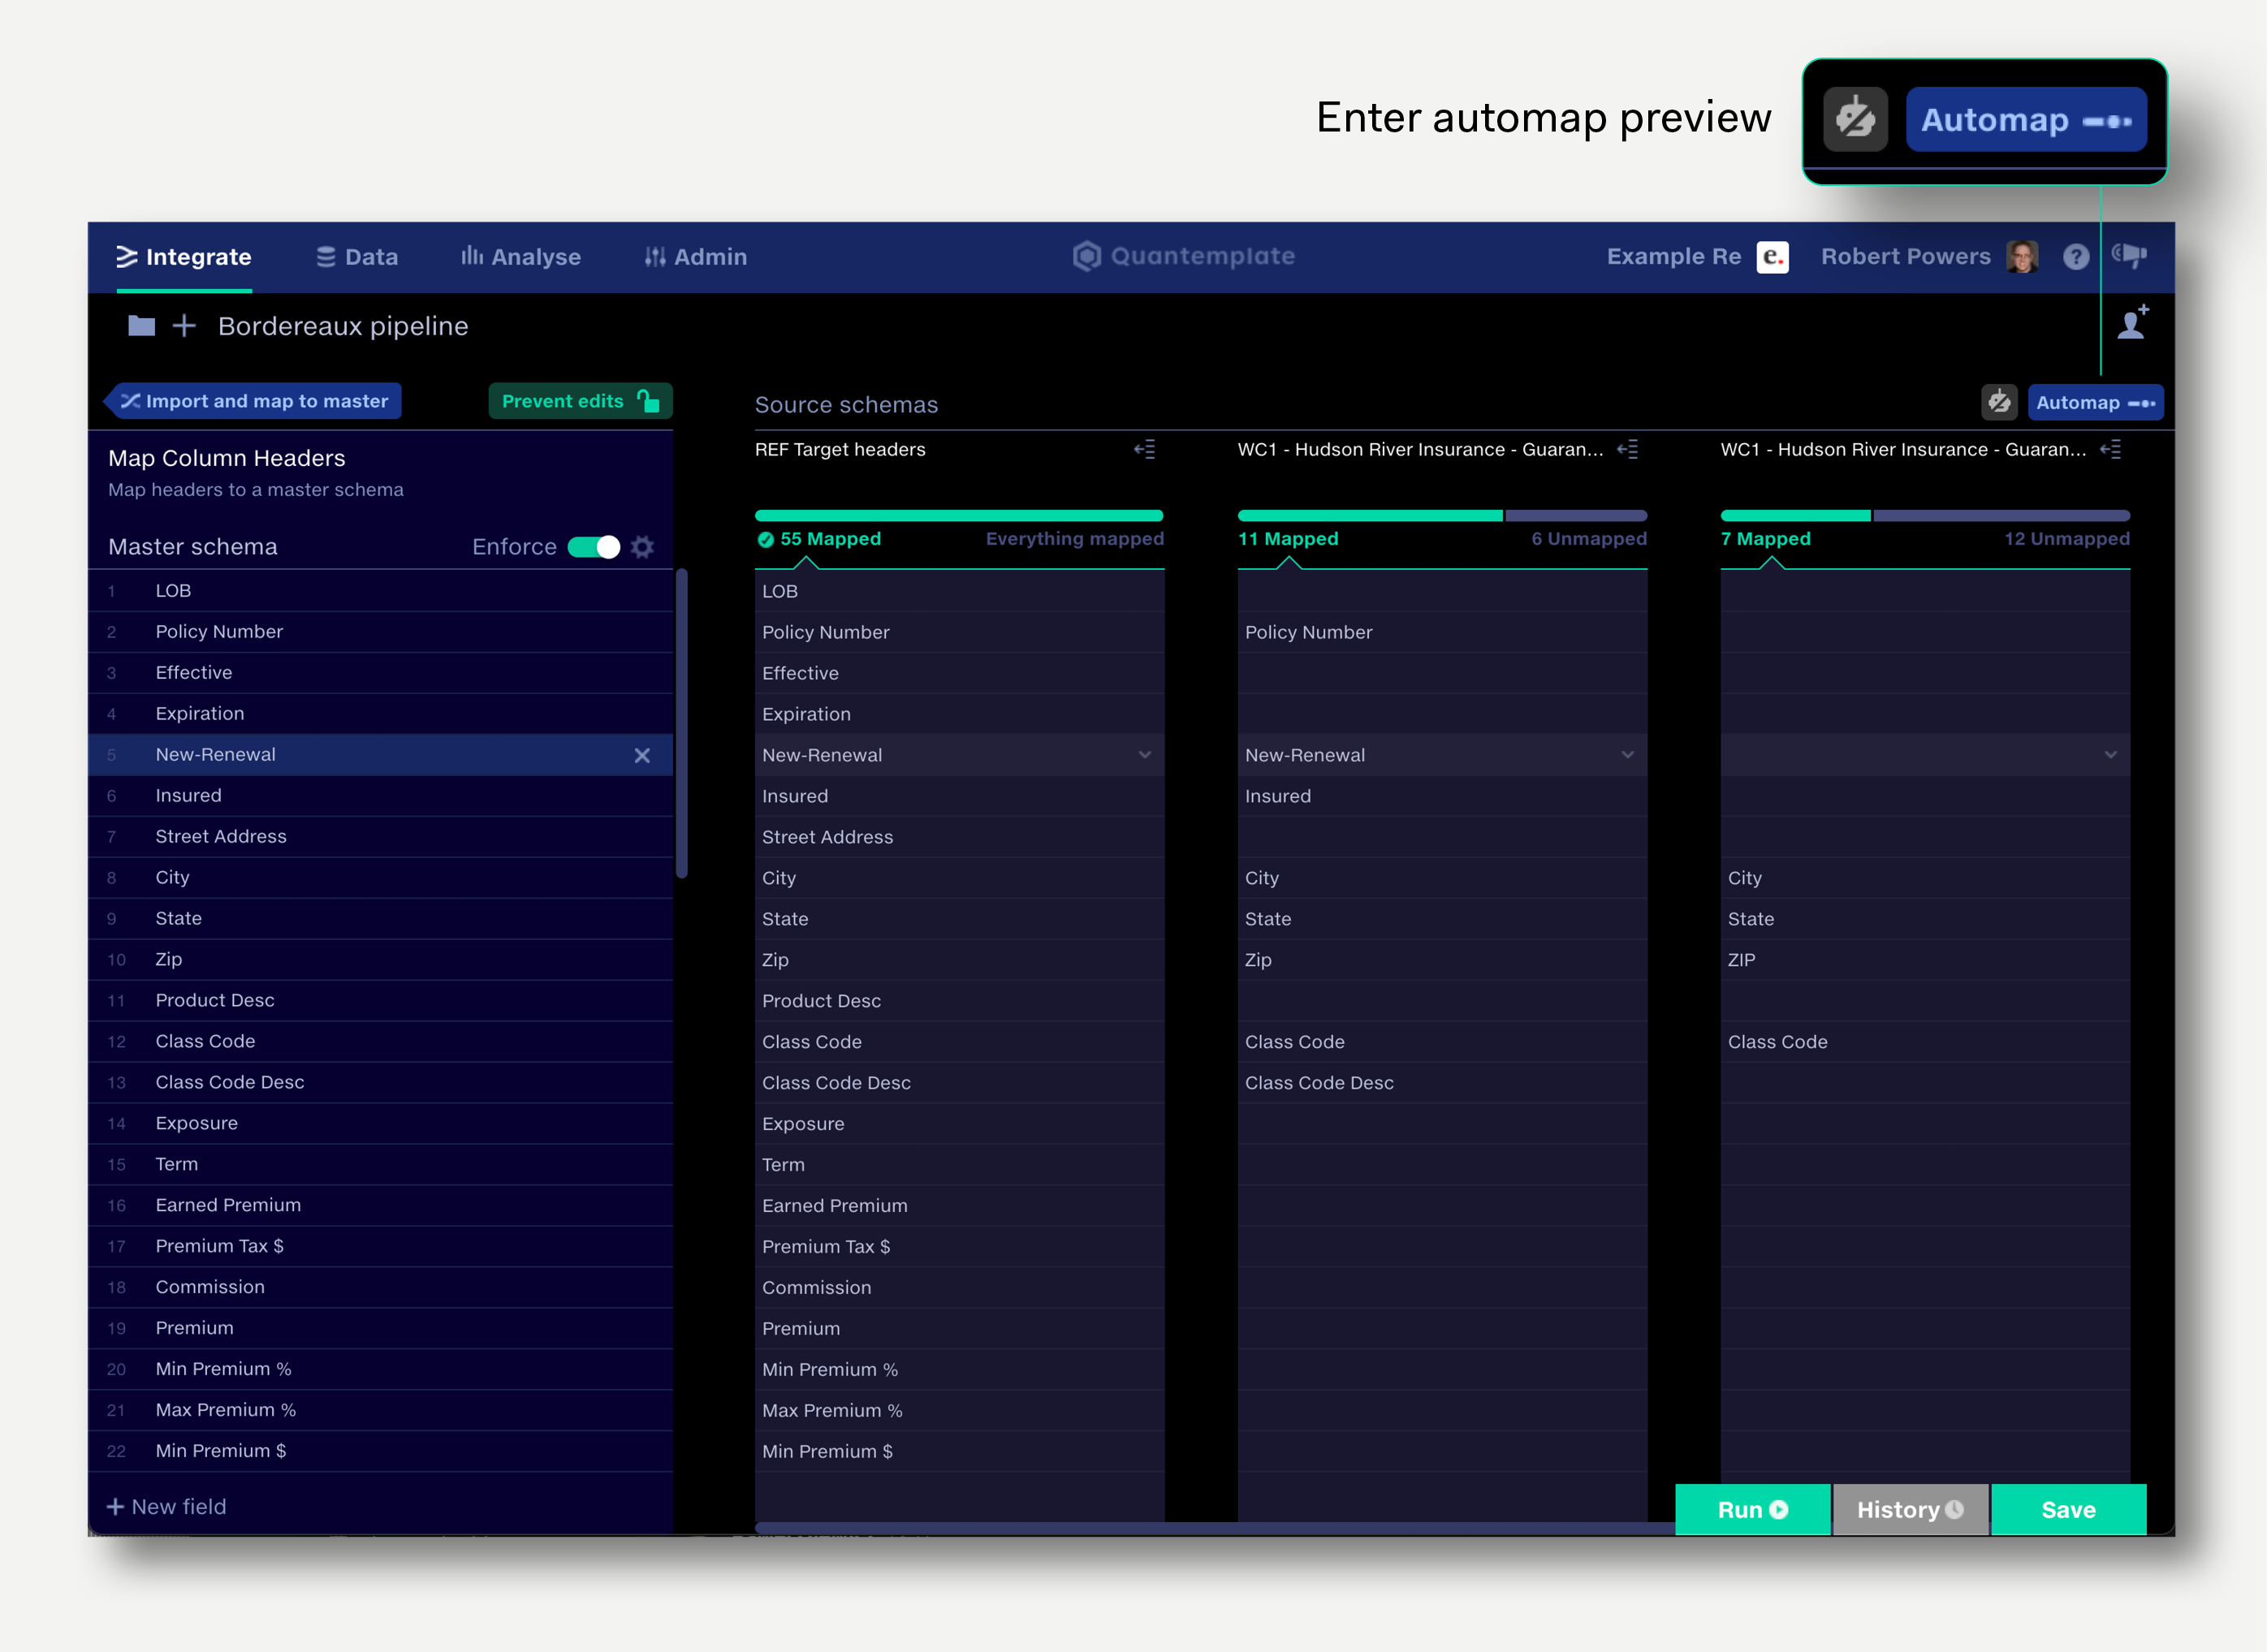
The Automap preview mode shows the effect of adjusting the strength threshold on the applied mappings.
To Automap:
Note that for any given schema mapping suggestions and strength ratings may change over time as the ML-powered decision-making model learns from your mapping choices.
Mapped items will be overridden by suggestions. This is a ‘destructive’ mapping option since any mappings you have made previously will be overwritten. Off by default.
Fields which have been populated on a per-column basis will be overridden by suggestions. This is a ‘destructive’ mapping option since any per-column populated fields you have made previously will be overwritten. Off by default.
Note that fields which have been populated at a master schema level using the populate all function will always be overwritten by Automap.
Suggested mappings that are not in the master schema will be added to it. Note that the field that will be added to the master schema will be a mapping suggestion based on other mappings made within your organisation, not necessarily the exact field name in the source schema. The suggestion must also exceed the automap threshold for it to be mapped in. If you wish to add in additional columns with their names unchanged, consider disabling the enforce schema option.
Ordinarily, if an input file comes in with an unrecognised schema the user will need to map the file in again, assisted by the Automap feature which remembers previous mappings.
If the Automap feature is set to auto apply, there is no need for a user to open the Map Column Headers operation to map in the new file: Automap will map the all headers to the master schema that it finds a match for, above the strength threshold set in the operation. If the pipeline run has been triggered automatically (by a dataset update event, for example), there is no need to open the pipeline.
To enable auto apply, click the robot button next to the Automap button and set the toggle to ON.